-
Riding Schooling and Training
-
Health and Veterinary
-
Management
-
Mind Matters
-
Buying and Selling
-
Insurance Advice
FAQs


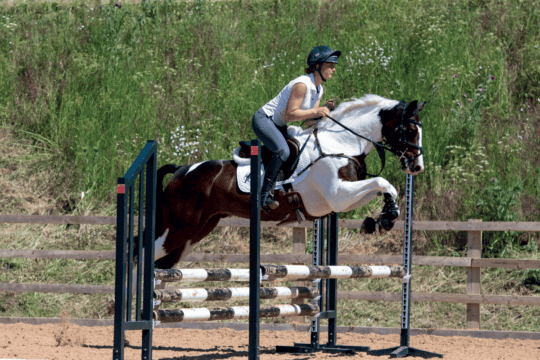
With a reputation as one of the UK’s most stylish cross-country riders, Izzy Taylor has made her mark on the eventing scene. Follow her as she shows Horse&Rider the exercises she uses at home to ensure competition success.

I take all my horses cross-country schooling early in the spring season to allow them to get their eye in. And the training doesn’t end there – especially for the youngsters, who continue to go out and about schooling between competitions throughout the year.
There really is no substitute for getting out and practising over solid obstacles, but between those cross-country schooling sessions, there are ways to fine-tune elements of your cross-country technique at home in the school. This includes ways to improve your approach to fences and your accuracy over them, as well as establishing good pace and tempo between jumps, which will improve your performance.
Start your warm-up right
Always begin with a warm-up that focuses on ensuring your horse is listening to your aids and moving forward from your leg into a strong, forward canter. Even though you’re in the arena, it’s important that you have a cross-country mindset. Out on a course, you will need to ride with a more attacking style than in the arena, so get into the zone by shortening your stirrups to the length you would ride at cross-country, come up into a light seat and check that your canter has plenty of impulsion to take you to the fence.
Practise lengthening and shortening your horse’s canter stride between markers in the school. You’re aiming for good adjustability in his canter without it affecting his tempo or rhythm. The more responsive your horse is, the less time you will waste setting up in front of a jump or bringing him back to the canter you need to jump a skinny fence after a long gallop. If you don’t work on this adjustability and responsiveness at home, you simply won’t be able to do it out on the course.
Successful cross-country riding is also about economy. Wasting time and energy between fences will have a big impact on your round, and when riding longer and more taxing courses, having enough fuel in both your own and your horse’s tank will be a deciding factor in whether you will have sufficient stamina to help your horse make the distance.
Build it up
Being confident in your partnership with your horse is essential. It’s important that he feels you are committed to the fence, because if he senses otherwise then he may lose confidence on the approach and be reluctant to jump. You can create this feeling of support with a sensitive, consistent rein contact and by having your leg close to his side at all times. It’s no good only riding him positively like this towards a fence – you need to make this your normal way of riding so that he learns to trust you.
While positive riding is an important part of your approach to a fence, that’s not the only thing to consider. The getaway is also important, because it forms part of your approach to the next fence. If your horse is prone to shooting off on landing, it’s important that you’re ready for him. Focus on getting him back into a steady rhythm as quickly as possible – this will help to get his attention back on the job at hand. The advantage of cross-country practice in the arena is that there is less space for your horse to shoot off after the fence, so to some extent he is forced to listen as you make decisions on turns and fences on related strides.
Izzy’s Top Tip – If I’m taking a youngster cross-country schooling for the first time, I always take an assortment of bits with me so that I can experiment on the day. If the horse isn’t happy with one, or isn’t accepting the bridle in it, I’ll see if a change in bitting helps the situation. I don’t worry about stopping and starting – it’s better to find a solution on the day than having to wait for our next outing.
Stride it out
A rule of thumb when measuring out distances is 12ft/4m to one canter stride. But not every horse has a ‘standard’ canter stride, so if your horse is struggling with the distance and finding it too long or too short, be prepared to adjust it to make him comfortable.
If you are keeping the fences quite small, you won’t need so much space between them – but the bigger the jumps, the more likely your horse is to need a full-sized canter stride.
Jump to it
Warm up over a simple cross-pole that you can approach from both reins in trot and then canter. Make sure your approach is straight and balanced, and consider your landing and getaway from the fence as you are riding into it.
It’s important to work on both reins so your horse doesn’t anticipate which way he is going to turn and use that as an excuse to run through the bridle. By keeping his attention focused on the job at hand, you will feel more confident, too, which makes riding positively much easier.
Initially, land on the rein you have approached the fence on, working equally from both directions. Help your horse to land on the correct lead by maintaining a little inside bend and look in the direction you want him to go. Next, start changing your landing direction in the air. The aids are the same as when you were staying on the same rein, except that this time you need to slightly move your weight and change the bend as your horse jumps. Look to where you want to go and open the corresponding rein to encourage him to land on the other lead. Your position on landing is extra-important here – check you’re not collapsing on landing because this will cause your horse to drop onto his forehand, sprawl and lose balance.
Izzy’s Top Tip – While you can’t use it at a competition, I often use a longer schooling whip for cross-country practice to ensure the horse respects my leg and moves off my aids.
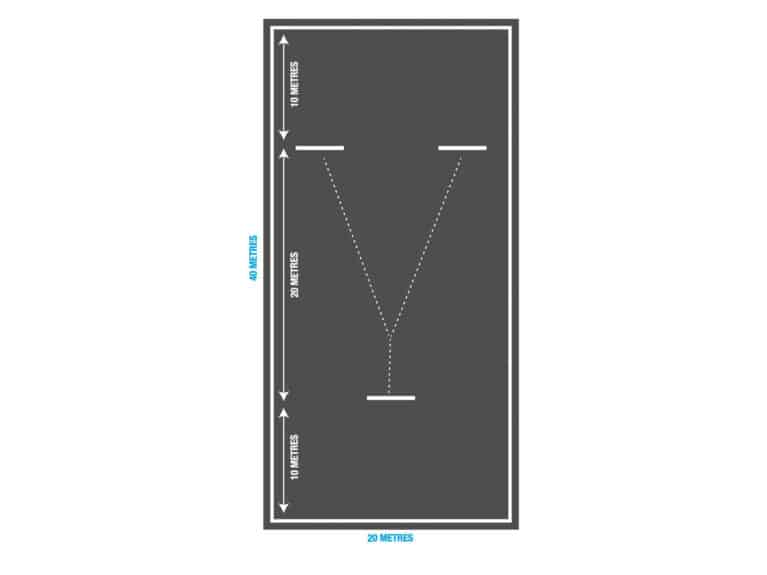
Moving up a gear
Once you can approach the cross-pole from either rein and choose the canter lead you want on landing, it’s time to make things a bit more complicated. Add two more jumps to your warm-up fence (see diagram below). Depending on how much space you have in your arena, place the extra jumps four or five strides beyond your first fence to create a dog-leg to the left and right. This exercise is great for honing your cross-country technique, because it allows you to try out different lines and approaches, while keeping the bigger canter you’ve developed. Before you start incorporating the fences into exercises, pop over them individually on both reins.
Because the fences are close together and there is a lot for your horse to look at, it’s even more important that you have his full attention. Use half-halts and transitions to ensure he is listening to you, all the while maintaining a positive, controlled canter.
Stop right now
If your horse is strong on landing from a fence, don’t ignore his behaviour. When he evades you by shooting off after a jump, it can play on your mind on the approach, and even make you start riding backwards into the fence in anticipation of losing control after it.
Teaching your horse to get back into a good rhythm as quickly as possible after the fence is very important. Running away after the fence may not seem like a problem, but if he does it in a combination, he could soon get you – and him – into real trouble. Train away this behaviour by following my simple steps…
- The first few times you jump the fence, ask your horse to stop in a straight line within a few strides of landing. Don’t allow him to stop at an angle – be firm that the halt must be perpendicular to the fence.
- Once he has halted, reward him with a pat for listening to you.
- Move off in canter, alternating the canter lead you ask for.
- Once your horse accepts the transitions, you can begin to maintain canter on landing, always ensuring you re-establish your canter as soon possible.
- If he begins to ignore you again, go straight back to halting after the fence. He will soon learn that shooting forward after the jump is not an acceptable response.
- Be quick to reward him when he does as you ask. A pat or a wither scratch will let him know you’re pleased.
Izzy’s Top Tip – If you use a different bit for jumping, then use it for arena cross-country practice. However, if your horse wears a different bit for cross-country than for other disciplines, stay in your day-to-day bit. Even though it’s cross-country practice, to your horse these exercises are a lot like showjumping! Also, the arena is a good place to practice getting get your horse to be responsive in the softer mouthpiece.
Jumping corners
Cross-country riding requires accuracy, and the course builder will test just how accurate you and your horse are by setting technical questions with narrow fences that invite your horse to run past them. Few fences need more precision riding than corners and the good news is that you can easily create one at home. As your confidence grows, you can make the question harder by increasing the angle of the corner.
I use two upright wings for the wide side of the corner and a barrel or block for the narrow side. Some people will use a wing on the narrow side of the fence, but this creates a rather easier question because the wing acts as a guide and ‘holds’ you in over the fence. By using a low block, it’s only your accuracy that is controlling the jump. Before you head out onto the cross-country course, you need to know that it’s your accurate riding that gets you to the right point of take-off.
It’s important to meet the front rail on an angle. If you or your horse aren’t experienced with jumping corners, begin with a simple upright and jump it on an angle. The only difference when you progress to jumping a corner will be that you will be straight
and the rail will be at an angle, rather than the other way around!
Next up, you need to decide where to jump the corner. This really depends on how wide it is – but as a guide, you want to jump as close to the point of the corner as possible without making a run-out too likely. If you jump too far to the wide side of the fence, your horse may find the width of the corner a problem. Wherever you have chosen to jump the corner, as you begin your turn towards the fence, sit up and look at the part of the fence that you want to jump. Then ride positively and straight towards that point. You may find it easier to keep your horse straight into the fence by setting your hands slightly wider apart than normal and using your legs to funnel your horse between your hands. Remember to keep looking up and beyond the fence to where you want to land.
The good news is that jumping narrow fences is much like jumping a corner – they both demand accuracy and a balanced approach. So once you’ve mastered corners, skinnies should come quite easily! Nevertheless, it’s important to practice skinnies at home – try riding them with a straight approach, on related strides from other fences or even by jumping on the turn
Upping the impulsion
A common mistake riders make when approaching a narrow fence is to confuse a slow approach with increased accuracy. Actually, this can lead to a loss of impulsion, giving the horse time to waiver on his line and making it harder for him to jump the fence at the exact point you want him to – or indeed to jump it at all!